使用GPU.js提升Javascript性能
我们都知道Javascript是一种单线程的语言,当我们需要执行大量复杂计算时,单线程性能就显得捉襟见肘,当然Javascript也有web worker支持开启多线程,但这也是使用了CPU的性能还需要自己处理并行逻辑,显得有些麻烦。除了CPU浏览器也可以使用GPU来处理程序,我们熟悉的WebGL就是使用的GPU来计算的,但这需要开发人员熟悉WebGL语言,如果没有WebGL的开发基础,那么你可以尝试了解下GPU.js。
什么是GPU.js GPU.js 是一个JavaScript加速库,支持web或node中的javasctip使用GPGPU(GPU通用计算)。 GPU.js会自动将简单的JavaScript函数转换为着色器语言,并对其进行编译,使其能在您的GPU上运行,还有一个备用选项:在系统上没有 GPU 的情况下,这些功能仍将在常规 JavaScript引擎上运行。
性能提升多少? 由于GPU本身非常擅长的是大规模并发计算,根据机器配置不同,计算速度能提高1-15倍,本文我会使用两个示例来对CPU版本和GPU版本的性能进行对比
安装 Javascript的库,都懂的。。。
1
2
3
4
5
6
7
8
9
10
11
12
13
14
15
16
## install npm install gpu.js --save const { GPU } = require ('gpu.js' );const gpu = new GPU();import { GPU } from 'gpu.js' const gpu = new GPU()<script src="dist/gpu-browser.min.js" ></script> <script > const gpu = new GPU(); </script >
使用 先引用官方的示例,运行两个512 x 512的矩阵乘法 算法,我们先实现一个未使用gpu的原生javascript实现的矩阵相乘,在对比使用GPU实现的区别,最后测试两个在本地执行的性能
开始 先创建两个512x512的矩阵用作测试数据
1
2
3
4
5
6
7
8
9
10
11
12
13
//初始化矩阵 const generateMatrices = () => { const matrices = [[],[]] for (let y = 0; y < 512; y++) { matrices[0].push([]) matrices[1].push([]) for (let x = 0; x < 512; x++) { matrices[0][y].push(Math.random()) matrices[1][y].push(Math.random()) } } return matrices }
javascript: 1 2 3 4 5 6 7 8 9 10 11 12 13 14 15 16 17 18 19 20 21 22 23 function CPUmultiplyMatrix (a, b ) const width = a.length; const height = b.length; const result = new Array (height); for (let y = 0 ; y < height; y++) { const row = new Array (width); for (let x = 0 ; x < width; x++) { let sum = 0 ; for (let i = 0 ; i < width; i++) { sum += a[y][i] * b[i][x]; } row[x] = sum; } result[y] = row; } return result; } const matrices = generateMatrices()CPUmultiplyMatrix(matrices[0 ], matrices[1 ])
gpu.js: 通过gpu.createKerner函数将javascript代码转成GPU可执行的代码
1 2 3 4 5 6 7 8 9 10 11 12 13 14 const GPUmultiplyMatrix = gpu.createKernel(function (a, b) { let sum = 0; for (let i = 0; i < 512; i++) { sum += a[this.thread.y][i] * b[i][this.thread.x]; } return sum; }).setOutput([512, 512]) //生成矩阵 const matrices = generateMatrices() //将矩阵作为参数调用 GPUmultiplyMatrix(matrices[0], matrices[1])
区别 对比两个函数的话我们能发现在Javacript版本中是多写了两层循环的,其功能可以等同于GPU.js中的setOutPut([512, 512]),而this.thread.y和this.thread.x也相当于循环中的x和y,可以这样理解,GPU.js主要帮我们控制了循环部分,在内部应该是转化成多个线程来同时并发处理我们的程序。
1 2 3 4 5 6 7 8 for (let y = 0 ; y < 512 ; y++) { for (let x = 0 ; x < 512 ; x++) { } } setOutPut([512 ,512 ]]
setOutput 最多可以支持三维,在循环中通过this.thread.x,this.thread.y和this.thread.z来取值,例:
1 2 3 4 5 const kernel = gpu.createKernel(function() { return this.thread.x; }).setOutput([10]); kernel() //result [0,1,2,3,....9]
性能对比 接下来本地跑一下两个函数,看看性能有什么差别,我们使用benchmark.js 来进行测试
1 2 3 4 5 6 7 8 9 10 11 12 13 14 15 16 17 18 19 20 21 22 23 24 25 const Benchmark = require ('benchmark' );const suite = new Benchmark.Suite;suite .add("CPU" , function ( CPUmultiplyMatrix(matrices[0 ], matrices[1 ]); }) .add("GPU" , function ( GPUmultiplyMatrix(matrices[0 ], matrices[1 ]); }) .on("cycle" , function (event ) console .log(String (event.target)); }) .on("complete" , function ( console .log("Fastest is " + this .filter("fastest" ).map("name" )); }) .run({ async : true });
看下上面的logs,ops/sec 表示代码执行次数每秒,这个值越大越好,可以看到在我本地机器GPU的执行速度是CPU的*20*倍,速度提升还是很明显的(测试是在nodejs环境中执行)
图像处理 有时我们想输出一个图片,而不是单纯的数值计算,那么我们可以设置setGraphical(true),函数内部使用this.color(0,0,0)来设置像素点颜色。
1 2 3 4 5 6 7 8 9 10 const render = gpu.createKernel(function ( this .color(0 , 0 , 0 , 1 ); }) .setOutput([20 , 20 ]) .setGraphical(true ); render(); const canvas = render.canvas;document .getElementsByTagName('body' )[0 ].appendChild(canvas);
卷积计算 第一个例子是一个纯计算的我们只是在控制台查看数据表现,下面来尝试一个稍微复杂点的图片处理,并对比下在Web上速度有没有明显的提升,实现一个图片的卷积计算(Convolution) ,使用3x3大小卷积核((Kernel) 。
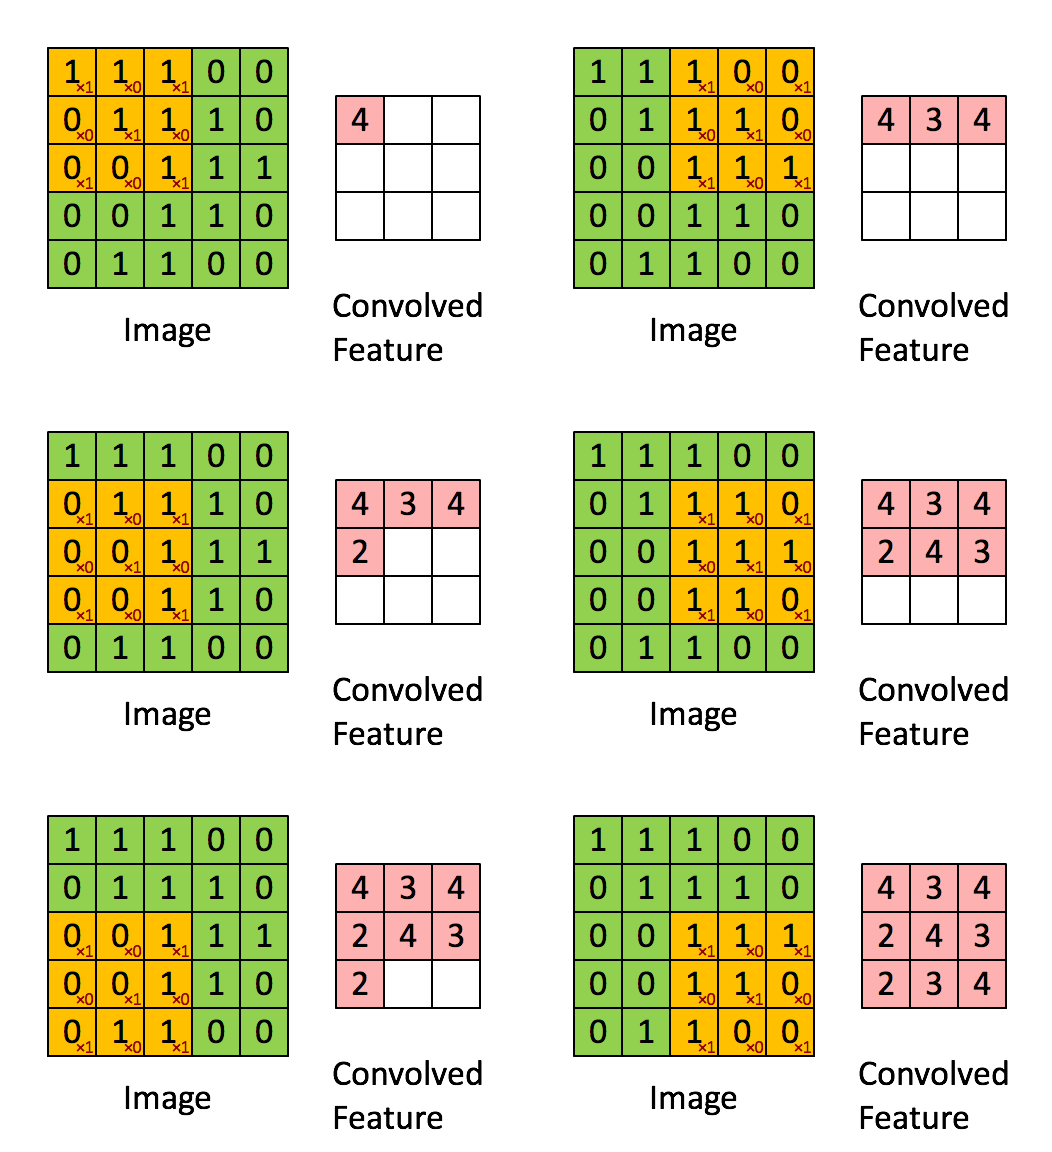
先简短介绍下什么是卷积计算,可以使用一张动图来说明就比较简单,当卷积核在图像上扫过一遍为一次卷积计算
每次的计算算法展开如下:
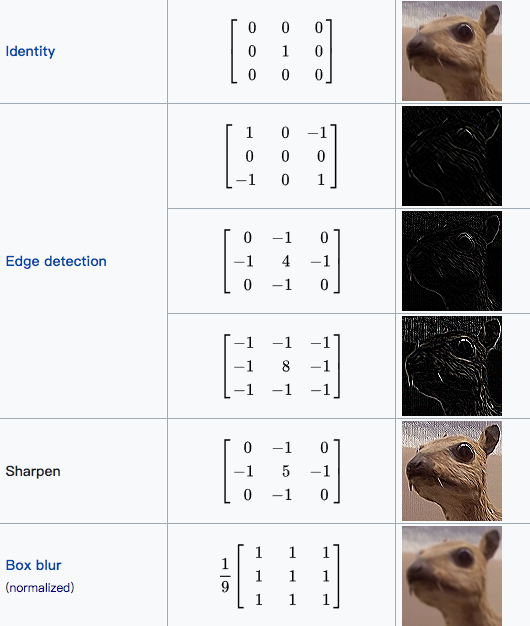
下图是些常用的图片处理的kernel,右边是卷积后的效果:
我们就拿Edge detecition中一个来测试下效果:
1 2 3 4 5 6 const edge = [ [-1 , -1 , -1 ], [-1 , 8 , -1 ], [-1 , -1 , -1 ] ];
代码实现 gpu.js convolution实现
1 2 3 4 5 6 7 8 9 10 11 12 13 14 15 16 17 18 19 20 21 22 23 24 25 26 27 28 29 30 31 32 33 34 35 36 37 38 const edge = [ [-1 , -1 , -1 ], [-1 , 8 , -1 ], [-1 , -1 , -1 ] ]; const convolution = function (image, width, height, kernel, container ) const render = gpu .createKernel(function (image, kernel ) let r = 0 , g = 0 , b = 0 ; for (let i = 0 ; i < 3 ; i++) { for (let j = 0 ; j < 3 ; j++) { const pixel = image[this .thread.y + j][this .thread.x + i]; r += pixel.r * kernel[j][i]; g += pixel.g * kernel[j][i]; b += pixel.b * kernel[j][i]; } } this .color(r, g, b); }) .setOutput([width, height]) .setGraphical(true ); render(image, kernel); container.appendChild(render.canvas) }; const image = document .createElement("img" );image.crossOrigin = "anonymous" ; image.src = '../xxx.jpg' ; image.onload = function ( const {width,height} = image convolution(image,width,height,dom) }
javascript版本:
1 2 3 4 5 6 7 8 9 10 11 12 13 14 15 16 17 18 19 20 21 22 23 24 25 26 27 28 29 30 31 32 33 34 35 36 37 38 39 40 41 42 43 44 45 46 const normalConvolution = function (imageData,kernel,ctx ) const { data,width,height} = imageData const result = ctx.createImageData(width, height); const outData = result.data const kernelSize = kernel.length const half = Math .floor(kernelSize / 2 ) for (let x = 0 ;x < width; x++){ for (let y= 0 ;y < height; y++){ const px = (y * width + x) * 4 ; let r = 0 ,g = 0 ,b = 0 ; for (let i = 0 ; i < kernelSize; i++) { for (let j = 0 ; j < kernelSize; j++) { const cpx = ((y + (i - half)) * width + (x + (j - half))) * 4 ; r += data[cpx + 0 ] * kernel[j][i]; g += data[cpx + 1 ] * kernel[j][i]; b += data[cpx + 2 ] * kernel[j][i]; } } outData[px + 0 ] = r ; outData[px + 1 ] = g ; outData[px + 2 ] = b ; outData[px + 3 ] = data[px + 3 ]; } } ctx.putImageData(result,0 ,0 ) } const { width, height } = imageconst canvas = document .createElement("canvas" )const context = canvas.getContext('2d' );canvas.width = width canvas.height = height context.drawImage(image, 0 , 0 ) const imageData = context.getImageData(0 , 0 , width, height)normalConvolution(imageData, edge, context) dom.appendChild(canvas)
执行效果对比 以下是使用一张7680x4320大小的图片,我们看下对比效果
gpu:
cpu:
可以明显看到gpu版本是会比cpu版的执行速度是有很大的提升
总结 本文主要简单介绍GPU.js的使用方法和通过具体例子比较了cpu和gpu的性能对比,如果你的项目中有一些需要大量计算的程序,或许可以尝试使用,关于gpu.js更详细的使用还需要自行到官网了解,文章中涉及的代码已上传到github ,感兴趣可自行查看。
参考 https://github.com/gpujs
https://en.wikipedia.org/wiki/Kernel_(image_processing)


